Monday, March 26, 2012

Success Story: Let There Be Light

Amazing Spaces, LLC brightens up a 20-year old kitchen and brings a little beauty to utilitarian spaces in a 20-year-old Colonial.
It was all about the light. When Jason Landau of Amazing Spaces, LLC met with his new clients, Maude & Don Delaski, the couple knew that parts of their 20-year old Colonial home need remodeling. Though they would eventually have a ground floor Powder Room and Laundry room redone, it was the dark kitchen that was the catalyst for the whole project.

The kitchen abutted a covered deck which made the whole space very dark,” recalls Maude. “Everything was outdated and worn out.”

The home was certainly well-used as the family once numbered five. As the kids grew and left home, the number of residents dropped to three (and two canine family members) but on holidays that number could swell to 22 or more. The Delaskis needed room for all and space for more than just one person to do the cooking.

A realtor friend recommended Jason Landau of Amazing Spaces, LLC who met with the Delaskis, took some measurements and immediately began seeing in his mind how more light could be let into the kitchen, as well as ways it could become much more user-friendly for the cooks and helpers.
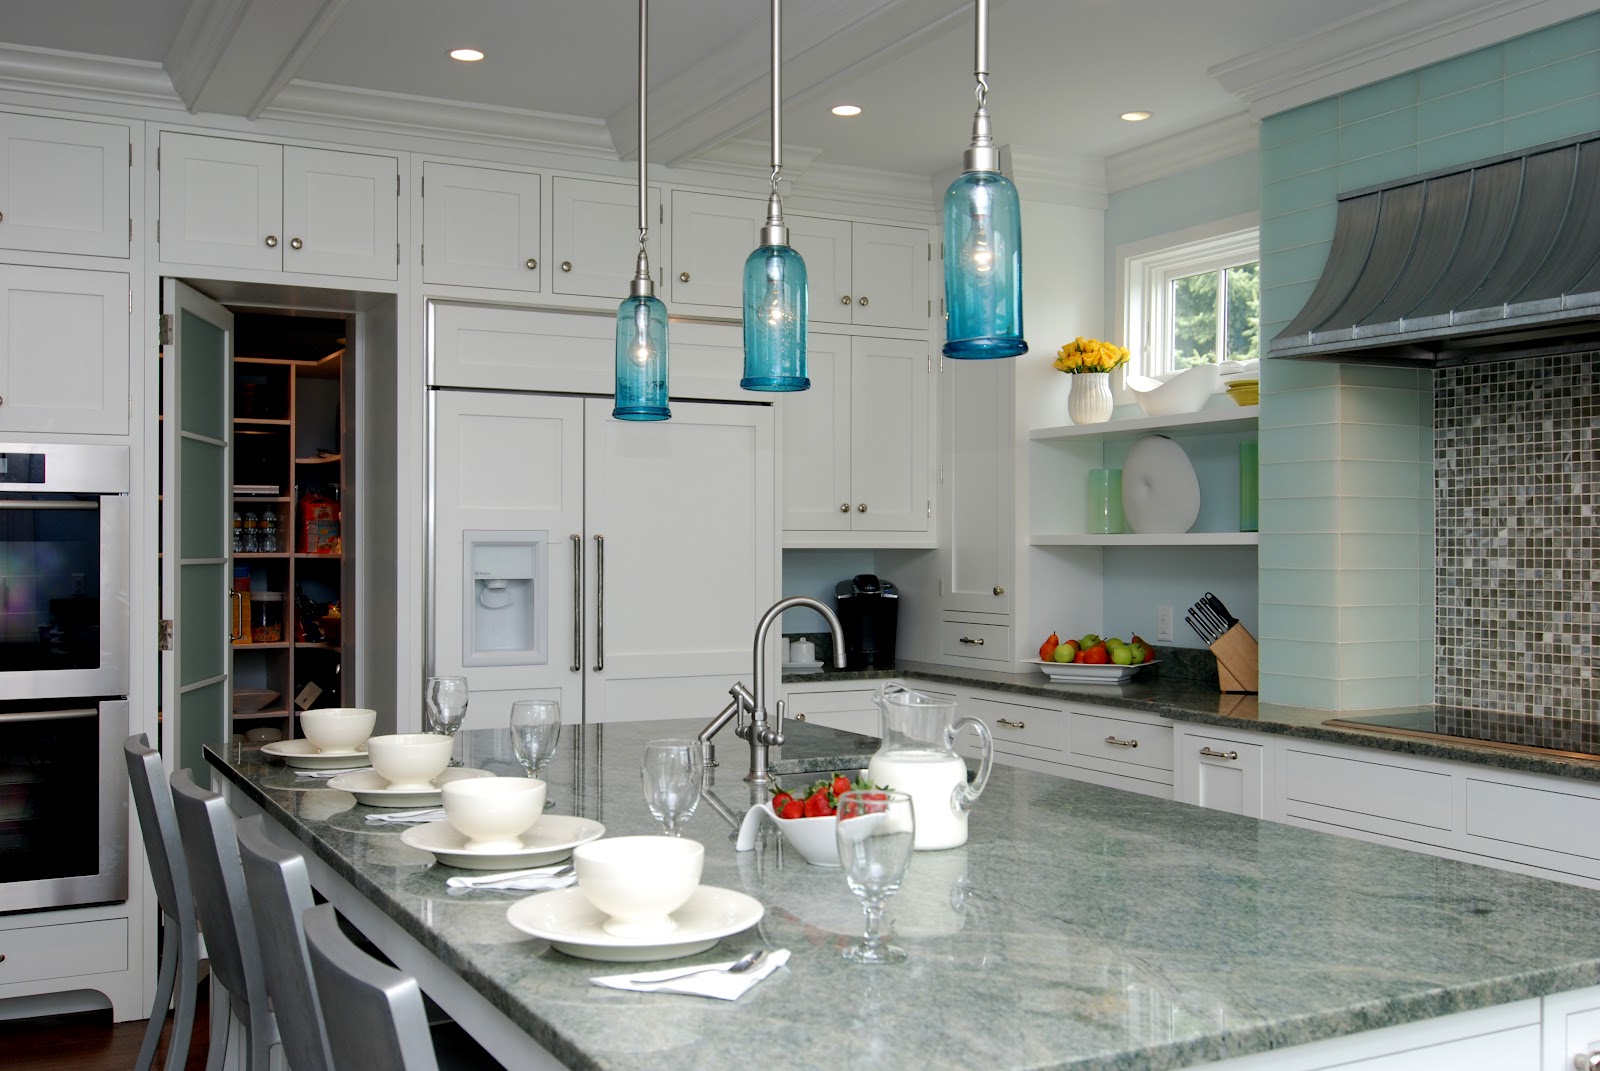
"Where there was once more cabinetry, I opened the space to a wall of windows and vaulted the ceiling of the 12-foot-deep covered porch,” says Landau. The family likes to grill out and eat in nice weather, so I added more light by installing skylights in the porch's roof”.

Jason hit the nail right on the head,” says Maude. “He had a vision right away about how to improve the kitchen. He went back to his office, drew up the layout, and off we went. We changed virtually nothing from his original plans.”

In the original layout, one-third of the kitchen was wasted,” Landau says. “I decided to separate the kitchen into two very functional sides-- one with everything the cook would need (the range, ovens, prep sink and part of the island ) and the other for everyone not doing the cooking (with a main sink, small appliances, Miele paneled dishwasher, and lots of counter space). The two areas would meet in the middle with both sharing access to the 42-inch paneled SubZero refrigerator.
The Delaskis chose a 48-inch Wolf range with six burners and a griddle (which they use much more often than they thought they would, with grilled chicken being a particular favorite).

I refer to my former stove the 'play stove' after I saw my new one,” says Maude.

The Delaskis also chose beaded inset paint and glazed maple cabinetry named Yellow Flicker from Levant, complete with mesh doors beneath the sink to add an upscale country feel.

We looked at lots of styles and colors in kitchen magazine,” says Maude, they found Jason a very reassuring presence. They largely followed his lead and only had one wrong choice that was quickly corrected after Maude sat straight up in bed one night and realized she couldn't live with the metal- accented tile she had picked when Landau took her tile shopping. “I chose something more toned down and now love the backsplash of Crema Marfil tumbled marble set in both subway and herringbone patterns.”

Another change came about when the finish on the island's Bronzite granite didn't suit the piece of granite they selected, so Landau suggested changing from a leathering finish to a polished surface and the resultant surface is stunning.

Recessed lights add extra wattage to the alabaster lights provided by the shaded pendants above the countertops and islands. The countertops elsewhere in the kitchen are Yellow River granite and the rich oak flooring gives the whole space an even warmer feel.

The kitchen is a huge upgrade,” says Maude. “Now the kitchen is elegant and professional. It not only makes cooking more fun, it makes the whole house more desirable for when we decide to sell.”

The Delaski's kitchen project came out great, in my opinion,” says Landau. “It is now the perfect example of how a good kitchen design can accommodate multiple people all making use of the space simultaneously.”
But Landau wasn't done yet. Amazing Spaces, LLC redesigned the existing Powder Room. Landau had installed a marble counter, an antiqued ivory buffet-style vanity (to complement the wood molding), a lovely blush patterned wall covering and hanging from the darkly-accented ceiling, a jewel-like chandelier.


Amazing Spaces, LLC created a beautiful little room,”says Maude, who also particularly appreciated that Landau moved the room's door out of the center of the sight-line of the home's front door.

It makes for more privacy and a nicer view when you enter the home,” explains Landau. 


The new laundry room replaced the previous one's builder cabinets, slop sink and an old washer and dryer with a stackable washer and dryer, washed blue cabinetry, a light marble counter (over which hang very useful clothing rods) and multi-tonal tile which reflects all the room's colors, making the room gorgeous as well as useful.
To complete all the projects took six months, but not only was all the dust contained, with the floors washed every night, but an entire mini-kitchen was created for the family's use during the renovation.

It was worth every penny and every minute,” says Maude. “We had a crowd over at Thanksgiving and my husband Don and I worked side-by-side in the new kitchen. Even the guest sitting at the table just off the kitchen pitched in to help. It was fun and everyone admired all the changes.”

The work Amazing Spaces, LLC did for the Delaskis was a true pleasure,” says Landau. “They were very open to making changes and I'm very glad they are delighted with the outcome.”


Let Amazing Spaces, LLC help remake your kitchen or bath. Please call Jason or Susie today at 914- 239-3725 or visit us at www.amazingspacesllc.com. We look forward to working with you.

Thursday, March 8, 2012

Countertops: Which type is best for your kitchen?


Next to cabinetry, perhaps the biggest design statement in your kitchen is your countertops. But besides being beautiful, you need the surface of your counters to be easy to clean, resistant to stains and long lasting. Here is some information about the different materials available to help you make an informed choice:
·      Granite: Always popular, granite is elegant, durable and resists heat, making it the first choice of many homeowners. Since it is a natural rock, the colors and pattern won't be consistent, but granite does come in a rainbow of colors and the natural pitting or inconsistencies in the rock itself make your countertop truly one-of-a-kind. You'll need to seal your granite countertops once a year.
·      Quartz: If you'd like more consistency in the color and texture of your countertop, Quartz is a very hard material that gives the look of natural stone, but has more consistency. It, too, comes in a range of colors and has a scratch resistant surface. Since it is non-porous, quartz doesn't need sealing annually.
·      Glass: This material is not porous and is therefore a good choice for homeowners concerned with hygiene. Glass also shows less fingerprints and dust, but it can scratch, so consider choosing textured glass for your countertop. A range of colors is available and glass’ ability to both reflect and filter light makes for many dramatic options.
·      Marble is the most regal of materials (reflected in its price) and like all things royal, takes more tending. Marble is more susceptible to staining and, as it is more porous than granite, needs to be sealed more often. The edges may also chip and crack, so be sure to choose a less fragile piece (be guided here by your kitchen designer’s advice) for use as a countertop.
·      Metal: Easy to clean, sanitary and heat resistant, metal counters (stainless steel, zinc or copper) are also very durable and can give either an ultra modern or rustic look to your kitchen. Metal counters do have some disadvantages: they will scratch when used as a cutting board and show fingerprints, dents, and water spotting. Using a textured or brushed surface helps hide these flaws. Also metal can be noisy, so it needs to be properly insulated when installed.
·      Concrete: Since concrete is scratch and heat resistant, it is a very durable material (that does required periodic sealing). Concrete also has the benefit of being able to be formed into any shape, since the concrete is poured into a custom mold, usually on site. Inlays and tinting can make concrete even more distinctive.
·      Corian: Countertops of Corian look like stone, but this material has a consistent color and pattern and can be molded in almost any shape. Stain resistant and easy to clean, it is heat resistant but don't put pots straight from the stove on it. Corian may also be scratched so use caution when cutting (shallow scratches can sometimes be removed with mild abrasive).
·      Wood: Butcher Block (usually made of maple) is not the only option for a wood countertop—others include cherry, teak, bamboo and mahogany. Each has its own characteristics, but the width of board (wide, medium or end-grain planks) and the thickness of the countertenor you choose will affect the price. Also finishing the countertop must be taken into consideration. Polyurethane, while durable, isn't the best choice for food prep and other choices, like sealer vs. mineral oil must be discussed with your contractor (and will be the topic of a future article here). Bear in mind that all wood tops will require re-sanding and resealing regularly.
·      Slate: a scratch and heat resistant, non-porous stone, slate needs no sealing, but mineral oil should be used for protection. Slate comes in a limited range of colors (black, purple, red, gray brown and greens) but when a matt honed finish is used, slate displays its own muted beauty.
·      Soapstone: This material is stain-resistant, but needs regular maintenance with mineral oil. Sort of a cross between marble and granite, Soapstone is softer than both and comes in smaller slabs, meaning you may end up with more seams in your kitchen. The smooth surface is smooth and its color palette is limited to blacks, greens and grays.
·      Ceramic Tile: Though ceramic tiles comes in many colors, textures, patterns and price points, as a countertop material it has drawbacks: tiles can crack or chip, the surface isn't smooth, grout lines need cleaning and sealing, and can often stain.

When choosing the perfect countertops for your new kitchen installation, it is best to consult an expert. Jason Landau of Amazing Spaces, LLC is an award-winning kitchen designer who can help you make an informed choice. Give him a call at 914-239-3725 or visit the Amazing Spaces, LLC website at www.amazingspacesllc.com to see a portfolio of their work.


Friday, February 24, 2012

Caring For Your Fine Wood Cabinetry

With spring cleaning just around the corner, thoughts often turn to giving your home a thorough scrubbing, but in the case of your fine wood cabinetry, you need to exercise some caution. Just like your elegant dining room table or those heirloom chairs handed down from your Grandmother, your fine wood kitchen cabinetry also deserves your loving touch.

Wood reacts to light, temperature and humidity, and all three must be addressed to extend the life of your cabinetry:
·       Sunlight’s effect: While wood gradually mellows into a richer shade with exposure to normal daylight, avoid excessive direct sunlight, which can fade the wood dramatically.
·       Setting the temperature: Wood cabinetry is best maintained at a room temperature of 70 degrees.
·       Controlling humidity: The wood products used in fine cabinetry is based on furniture industry standards. Such standards dictate that the wood be conditioned to a 5-8% moisture content in the wood. The humidity in the kitchen itself should be maintained at between 25-55% to be a compatible environment for wood cabinetry. As humidity increases, wood gains moisture and expands. If the humidity decreases, it contracts. Such expansion and contraction can, over time, become visible at the joints of the cabinets and frames. (These stresses are more visible on painted finishes.) Normal stresses that happen in a properly humid environment are a natural characteristic of the wood and not considered a defect. But humidity higher than 55% can cause wood failure—meaning cracks, splits, and separation at the joints—causing door expansion (meaning the door will rub against the frame when opened or closed). Humidity lower than 25% can cause problems of its own from wood's shrinkage, which may create cracks.
How to clean your wood cabinetry:
·      To avoid scratching, never use abrasive cleansers or pads on cabinet surfaces. They can cause scratches.
·      Always keep cabinet surfaces dry and free from standing liquids.
·      Use environmentally safe cleaners like Mrs. Meyer’s Clean Day, Method, Seventh Generation, Caldera or Ecover at a ratio of two cups water to two teaspoons of soap. Don't use strong soaps, detergents or liquid wax cleaners.
·      You can experiment with a quality wood wax, but try it on an inside surface first to see the effect. Many people never use anything but soap and water on their wood cabinetry.
·      Stained finishes: Remove the dirt and grease using mild soapy water, a soft cloth and light pressure. Avoid rubbing too vigorously. Rinse immediately with a clean cloth and dry with a clean soft cloth.
·      Painted or Matte Finishes: Never use wax on these surfaces. Wipe with soft cloth and mild soapy water solution. Rinse immediately and never let water stand on cabinetry.
·      Metallic Inserts: Don't use anything abrasive (pads or cleaners) as you can permanently damage the insert's surface. Also avoid acids, solvents and ammonia-based cleaners as you may etch the surface of the metal.
·      Hinges: Keep the hinges lubricated with white lithium spray grease. As hinges may loosen over time, you may need to tighten the screw to restore them to perfect working order (remove the hinge cap on frameless cabinets to access the hinge screws).

For more questions about caring for your fine wood cabinetry or to choose new cabinetry to install, please contact kitchen designer, Jason Landau at Amazing Spaces, LLC. Jason's decades of experience with choosing, installing and caring for fine wood cabinetry will help you protect your investment for years to come. Visit www.amazingspacesllc.com or phone 914-239-3725.

Wednesday, February 15, 2012

Tying Together Rooms With Color


Boxy little rooms, all decorated separately, is dated design. Today's savvy homeowner wants sight lines to and continuous flow between rooms. Such a flow creates harmony, but carving out a connection between rooms in the open floor plans favored these days can be a challenge. The key is vision and to see “The Big Picture” and for this you may need the help of a professional kitchen designer, like Jason Landau of Amazing Spaces, LLC. One of the ways Landau creates a harmonious flow between rooms is by the clever use of color.

Landau's training in architecture prepared him to see how seemingly disparate elements can come together to create a seamless whole. Landau keeps in mind that light, texture, shape, scale, pattern, and color are all elements of successful design, but balance must be heeded above all. A kitchen design should have energy, but not be too kinetic or disruptive. The design should flow as naturally as a creek over pebbles.

First the designer will help you consider the space. What rooms will you be able to see from the kitchen? What portions of other rooms? Then try to see, with the help of your designer, all these spaces as connected, not separate entities. It's like looking at a whole mountain range instead of only one dramatic peak.


Then choose five paint colors you like without considering which paint would go where in your final design. A color palette may suggest itself by your choices or you might want to discard two of the colors that don't seem to work with the others. If you find the colors all in the same family of hues, say blues/greys/silvers, start to envision how they might work in the various spaces:
  • Make use of a color wheel where shades are grouped into schemes and color combinations are suggested.
  • Colors can carry through to more than one room or act as background colors or accents.
  • Molding, baseboards, wainscots and window frames may be the only use of one color or perhaps the ceilings may share this color.
  • Try blending color or using a lightly colored glaze to complement a darker wall color in the connecting room.
  • Blending glazes can “suggest” a color in a hallway, blossoming into a brighter shade of that same color in the room the hallway opens into—creating a flow from one space to another.
  • Varying the intensity of the paint application or adding texture suggests movement while maintaining a harmonious whole.
  • Take artwork and furnishings into consideration. Focal points for each can be create by contrasting colors or brightness around the piece and then used in nearby rooms in larger areas as a tie-in.
  • Tiles may be used—both as a backsplash in the kitchen and with a center decorative band that carries throughout the adjoining rooms.
  • Trying a sample of various colors painted on small sections of your walls may help you visualize how the scheme will come together.
It is said that the eye “carries the color” from room to room as you walk through the house. Make sure that the colors your family and guests carry are soothing, inviting, or invigorating, creating a positive subliminal message: Your environment is a warm and welcoming one.

For harmonious kitchen design and space planning, call Jason Landau at Amazing Spaces, LLC at 
914-239-3725 or visit www.amazingspacesllc.com.

Monday, January 30, 2012

Kitchen Flow Helps Function


Jason Landau, owner of Amazing Spaces, LLC kitchen design firm was quoted in a recent syndicated news article "Good kitchen design is all about interior flow”.

Landau, with his architectural background and years of experience in designing some of the most beautiful kitchens in the Northeast, knows that how a kitchen looks isn't the only important thing...how it functions is the vital element.

A good layout for a kitchen allows for dedicated areas for meal preparation, cleanup, storage and perhaps even entertaining.

Landau always starts with the basics.

The classic triangle (the distance between the sink, refrigerator and cooktop) means that each of these areas become a focal point and each forms three points of a triangle with different distance between them. Saving steps for the cook, the properly planned kitchen triangle provides the most efficient food prep area and creates an easy-to-reach cleanup area.

In classic kitchen design, the total distance from the sink to the stove to the refrigerator and back to the sink should be not less than 12 feet total nor more than 27 feet. Each triangle leg should measure between 4 and 9 feet in length. The kitchen aisle should be at least 42 to 48 inches wide to allow people to move around easily and for appliances to be opened with ease.

A good layout places the appliances properly to ensure the best workable area. The sink needs to be close to the dishwasher for easy loading. The refrigerator should be at hand near food prep areas. Food disposal and recycling bins should be near cleanup areas. Cooking utensils, pots and pans should be stored nearby the stove and every kitchen needs plenty of drawers.

An experienced designer like Landau meets with his clients when he plans to renovate or build a new kitchen for them, and has in-depth conversations with them about their needs, striving to fully understand how they actually use a kitchen. Most clients now count on their kitchens to be multi-use.

Kitchen islands are very popular in homes and can help keep work areas traffic-free, while providing extra food prep, counter and storage space. The island can even host an extra sink, a mini-fridge, an island grill or even a wine rack.

Kitchen alcoves hosting a table (once nearly extinct as formal dining rooms became the must-haves) have made resurgence for casual meals, and as a place to do homework, as a child’s play space or even do double-duty as a desk.

Kitchens opening to a family room with entrainment cabinetry, bookcases, comfortable furniture and the de rigueur widescreen TV are always a favorite and allow the chef to join the conversations while preparing a meal.

But there are classic shapes to kitchen design and each has its benefits depending on how you plan to use the kitchen:
L-shaped: This shape can be used in both large and smaller kitchens and often allows for a center island. With two or three appliances on one wall, a refrigerator at one end, the sink in the middle and the cooktop on the other, this shape allows good traffic flow
Double L-shaped: With room for plenty of counter and cabinet space, this shape can even be designed to accommodate two people cooking, allowing each their separate area.
U-shaped: This shape has three walls with the sink usually in the middle wall section and the cooktop and refrigerator on the side walls across from each other. This makes for an efficient working triangle. You might need to make use of Lazy Susan’s or pullout shelves to accommodate the corner cabinets this design requires and use large windows, skylights or task lighting to lighten up the darkness sometimes caused by the many cabinets used in this design.
G-Shaped: This layout gives you a fourth wall to use for a counter or island. You'll have room for two cooktops or two sinks and conceivably two work triangles—say one for the sink, cooktop and refrigerator and the other for another cooktop, sink and maybe a grill. This affords plenty of room to two cooks to work in tandem.


Galley: If space is limited, the galley-shaped design saves the day. The cooktop should be on one wall and the sink and refrigerator on the opposite walls, so as not to impede the flow. If both ends of the galley are open, the refrigerator should be placed at one end so family members can grab a soda without disturbing the cook. (This is definitely a kitchen designed for one cook.) Using tall (to the ceiling cabinets) helps maximize storage
Single-Wall:
 For that apartment in the city, the design placing all appliances and cabinets on one wall helps make the most of a smaller space. In this design, the sink is between the refrigerator and stove, with the refrigerator door opening away from the kitchen sink.

An experienced kitchen designer, like Jason Landau of Amazing Spaces, LLC can make sure that the flow in your new kitchen keeps traffic moving and saves the cook many steps. Amazing Spaces, LLC can turn your nightmare kitchen into a dream. Call today to start the conversation. 914-239-3725 or visit us at http://www.amazingspacesllc.com.

Friday, January 6, 2012

Out With The Old (Clutter). In With New Storage.

If your New Year's resolutions include clearing away some of the clutter of life, a good place to start is in your kitchen. Throw away those mismatched plates, orphan cutlery and scorched pans and take an inventory of what you have left and what you need to buy. (You can take advantage of those post-holiday, January White and President's Day sales to stock up.) Then rethink the storage available in your kitchen and consider renovation.  


Wouldn't it be great to finally have a place to put everything and still have all you need close at hand? Innovative storage is the answer, integrating ease-of-use and style. Here's some ideas how to create great storage in your kitchen.

Consider Function: Cookbooks need to be near the cook and those hand towels need someplace to dry. Use a little imagination to craft solutions that are both practical and pretty. Clever storage makes lighter work for the chef. 

Use Lots Of Drawers: They are not just for silverware anymore. From produce to spices, hide away what doesn't need to be seen but does need to be ready at-hand for the cook. Also take advantage of what used to be considered dead space—like hollow columns—as handy storage space. 


Go High Tech With Pantries: Everyone wants a big pantry but may not have the space to spare. Modular pull-out shelves multiply the space and options, like stainless steel restaurant rack shelving, helps create a clean feel. The days of shelf paper and clearing the back of crumb-filled shelves are past. 

Integrate Appliances: Dishwasher and refrigerators can be built-in to be absolutely flush with the cabinetry around them—not wasting one inch of useable space, even in the smallest kitchen. The appliances themselves can even do triple duty with the top compartment being the refrigerator, the middle the freezer, and the bottom a wine cooler. Or a small wine cooler (or soda cooler for the kids) can be a built-in appliance on its own, keeping a perfect temperature for your favorite vintage or lessening your energy bill from kids opening and closing the refrigerator constantly.


Make It Modular: Keeping everything in its place is easy when every item has its own cubicle. Open boxes can also show day-to-day dishes, making table-setting (and clean up) a breeze.

Dramatize Your Drawers: A little molding or trim makes storage feel customized. Make the drawers adjustable to serve your changing storage needs. A pull-out just above the drawer can also serve as an extra cutting board or prep space.

The advice of an experienced kitchen designer can open your eyes to a whole new world of storage available to you in the space your (inconvenient) kitchen currently occupies. Call Jason Landau and his team at Amazing Spaces, LLC today at 914-239-3725 and get started on an uncluttered 2012.

extra photos courtesy of GE Monogram

Sunday, December 18, 2011

Glass Tile: Add A Little Shine To Your New Year

Glass tile brings shine, drama and depth to your home's surfaces and its lovely luminescent quality makes it an ever more popular choice for kitchens and baths. True, it is a little more expensive than ceramic tiles, but the artistry it brings to the project makes it well worth the extra cost.

How's It Made
Glass tiles can be made in several ways including cut and cold-cooled, processes in which there is no heat, just cutting or casting (which means mixed chemicals and sands are melted in a tank, then dropped into cooling trays). The glass will vary in color and shape—even texture—with some tiles retaining little bubbles within. Each tile will be as unique as a fingerprint and with infinite varieties comes many ways to customize each tile project to suit your individual taste.


How Does It Hold Up?
Don't let glass tiles fragile appearance fool you—it can be as strong and durable as ceramic tiles. Since glass is not porous, it doesn't absorb moisture (which allows for the growth of mold and mildew). If the glass tiles are properly installed, they will last (and remain beautiful) through years of use.

What Is “Proper Installation”?
An experienced installer will be knowledgeable in both cutting the glass or setting the individual tiles correctly. In the case of glass tiles, where the tiles are translucent, the thin-set (subsurface) must be perfect and is usually white to create a clear background that won't affect the color of the glass. Grouting is important, too. Usually epoxy grouts are used because they last a long time, are non-porous and non-absorbent (like the glass tiles themselves) and resist breakdown and stains. They are mixed with hues (and even sparkles if you choose) as well as with antimicrobial products, like Microbran, to discourage the growth of mold and mildew. This also means the grout will need very little maintenance over the years--though it's rubbery characteristics required an experienced installer. Amazing Spaces, LLC hires the best installers in the business for our clients' installations.


Types Of Glass Tile
From hot crayon colors to shimmering opalescent, the palette and types of glass tiles are infinite. Recycled glass tiles are eco-friendly, mosaic tiles come on a mesh backing allowing you to create flowing shapes and there are hundreds of handcrafted tiles from which to choose. Squares are no longer the only shape—now you can intersperse different colored rectangles or even shapes reminiscent of nature, like glass pebbles. Your imagination is your only limit.


How To Care For Glass Tile
Since the tiles aren't porous, they are very easy to clean, but be aware--you never want to scratch glass tiles, so use a soft cloth and water. Also hard water might cause some mineral spots. These are best removed with white vinegar sprayed on to the tiles. Rinse and neutralize with baking soda. Wipe with a soft cloth. With gentle care, your glass tile installation will remain shining and gorgeous for years.

If you are considering adding a bit of dazzle to your kitchen in 2012, the professional team at Amazing Spaces, LLC stands ready to help. Headed by Jason Landau (an award-winning kitchen designer with a Masters degree in Architecture) the team at Amazing Spaces, LLC will make your dream a reality. Please visit our website at www.amazingspacesllc.com or call us at 914-239-3725.